GL Posting in SAP
- ADHARSH K S
- Dec 15, 2023
- 3 min read
Updated: Oct 3, 2024
The GL posting in SAP refers to the process of recording financial transactions in the G/L accurately, and it provides a basis for generating financial statements and reports. A G/L document in SAP contains key information related to a financial transaction.
The GL document in SAP is typically divided into Two parts:
1. Document Header and
2. Document Line Item
1. Document Header: The document header contains data that applies to the entire document. To enter a document, you must first enter the document header.
G/L Document Header include fields of - Company Code, Currency, Posting Period, Document Date, Document Type, Document Number.

2. Document Line Item: The part of a document that contains information about an item. A document needs to have at least two line items (which is Dr. item against Cr. item). There is a limit of 999 line items which can be posted per FI document.
G/L Document Line Items include fields - G/L Account, Dr. & Cr. Indicator, Amount, Text, Tax Code, Value Date, Cost Center, Business Area.

Let's take an example of posting below transaction: Company Code ADD1 pays office rent amount of 10,000 INR, and the payment is made using a check.
Rent A/c | Dr. | 10000 | Cost Center* |
To Bank A/c | Cr. | 10000 | Value Date* |
>> Path to Post G/L Document {G/L Document Posting in screen FB50 or F-02 }

>> To Post with T.Code FB50 -
Debit and Credit entries are entered in one single screen.
STEP 1: Enter Document header first and then the Line item fields.
Make sure the total of all debits equals the total of all credits amount.

STEP 2 : Before Actual Posting, if you want to overview/test effect of G/L entry, click on Simulate.

STEP 3 : If the Accounting effect is right and Document is correct, then click on Post.


You can only edit the _Reference field_ and _Document header text_ of a Posted Document.
>> For Document Display use T.Code FB03 -
Enter Document Number, Company Code and Fiscal Year and click on continue.

Below is the view of Posted Document.

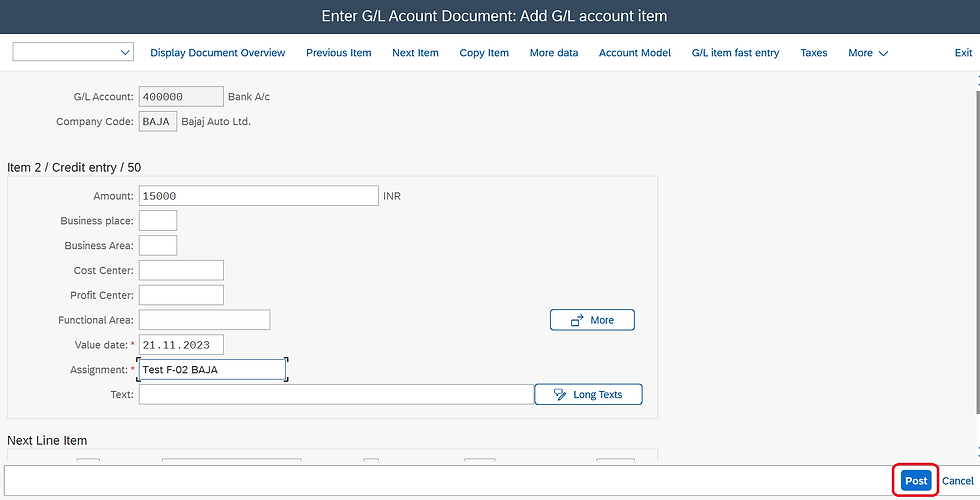
>> To Post G/L Document with T.Code F-02
Here, we have 4 different screens to enter fields, in order to post G/L Document.
STEP 1 : Enter header fields of the document like Document Date, Posting Date, Document Type, Company Code, Currency and Text , and press Enter.

STEP 2 : Enter Posting key and G/L Account number for 1st Line item and press Enter.

STEP 3 : Enter values of 1st Line item like Amount, Cost center and also Posting Key and G/L number for 2nd line item, press Enter to continue

STEP 4 : Enter values of 2nd Line item like Amount, Value date and Assignment and Post.

>> Use T.Code FBL3N to View G/L line item Display.
Enter G/L Account number, Company Code and Execute.

As seen below, display screen for both Line items .

Difference between Transaction FB50 & F-02
FB50 | F-02 |
|---|---|
Only a Single Screen to enter values & Post | Minimum 4 different screens to Post |
It is mandatory to mention document type | We need not assign any document type. |
You can mention directly Debit or Credit | You have to mention posting key for Debit or Credit |
Document can be parked even at the initial stage | Document can be parked only after at least one entry is entered |
Thank you for taking the time to read my blog. I appreciate your support and hope you found this content valuable. Stay tuned and follow me for more insightful articles in the future.
For full video package visit the link below:


EPTU Machine ETPU Moulding…
EPTU Machine ETPU Moulding…
EPTU Machine ETPU Moulding…
EPTU Machine ETPU Moulding…
EPTU Machine ETPU Moulding…
EPS Machine EPS Block…
EPS Machine EPS Block…
EPS Machine EPS Block…
AEON MINING AEON MINING
AEON MINING AEON MINING
KSD Miner KSD Miner
KSD Miner KSD Miner
BCH Miner BCH Miner
BCH Miner BCH Miner