The Vendor master database contains information about the vendors that supply an enterprise.
Steps to Configure for Vendor Master in SAP
Vendor Account Group
Vendors are classified according to their needs. Some suppliers with comparable features are grouped and assigned to a single category.
Path to create Vendor Account Group
IMG ⇒ Financial Accounting ⇒Accounts Receivable and Accounts Payable ⇒Vendor Accounts ⇒Master Data ⇒Preparations for Creating Vendor Master Data ⇒ Define Account Groups with Screen Layout (Vendors)
T.Code: OBD3
STEP 1: On the Display IMG screen, select Define Account Groups and Field Selection (supplier), by following the above path.

STEP 2: Click the New Entries button.

STEP 3: Fill in all necessary details such as the name of the account group, general data, and field status. Click the Save button. A new Vendor Account Group will be created.

Number Range
When we build a vendor master record, we assign each vendor a unique number known as the vendor number. We have external and internal number assignments for vendor master, just like we do for material master.
Path to Create Number Range
IMG ⇒ Financial Accounting ⇒ Accounts Receivable and Accounts Payable ⇒Vendor Accounts ⇒Master Data ⇒Preparations for Creating Vendor Master Data ⇒Create Number Ranges for Vendor Accounts
T.Code: XKN1
STEP 1: On the Display IMG screen, select Define Number Range for Vendor Master Record, by following the above path.

STEP 2: Click the Intervals button and create a number range for the customer account.

STEP 3: Click the Insert button and tick on the external check box.

Assignment of Number Range to Vendor Account Group
After we've defined a number range, we must assign it to a vendor group.
Path to Assign Number Range
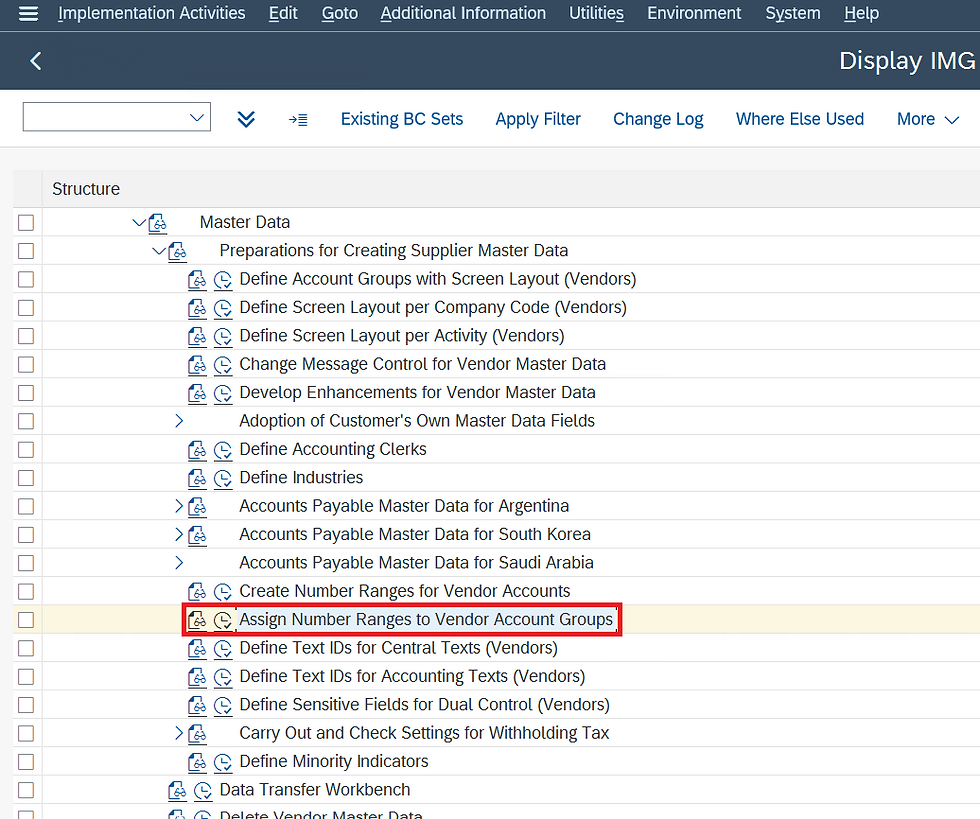
IMG ⇒ Financial Accounting ⇒ Accounts Receivable and Accounts Payable ⇒ Vendor Accounts ⇒ Master Data ⇒ Preparations for Creating Vendor Master Data ⇒ Assign Number Ranges to Vendor Account Groups.
T.Code: OBAS
STEP 1: On the Display IMG screen, select Assign Number Range to Vendor Account Group, by following the above path.

STEP 2: Write the number Range no. in front of Vendor Account Group and Save.

Number Range and Grouping
Here we create a number range, grouping and assigning together.
Path to Create Number Range
IMG⇒ Cross Application Component ⇒ SAP Business Partner ⇒ Business Partner ⇒ Basic Settings ⇒ Number Range and Groupings ⇒ Define Number Ranges
STEP 1: On the Display IMG screen, select Define Number Range, by following the above path.

STEP 2: Click on intervals to create a Number Range.

STEP 3: Create a Number Range and Save.

Path to Create Groupings and Assign Number Ranges
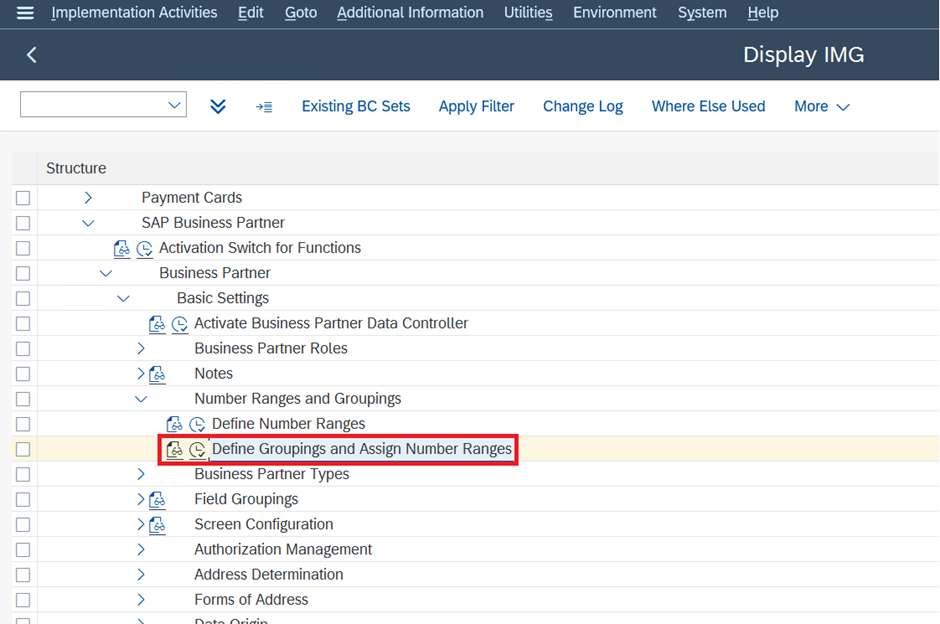
IMG⇒ Cross Application Component ⇒ SAP Business Partner ⇒ Business Partner ⇒ Basic Settings ⇒ Number Range and Groupings ⇒ Define Groupings and Assign Number Ranges.
STEP 1: On the Display IMG screen, select Define Grouping and assign Number Range, by following the above path.

STEP 2: Click on New Entries, to create a grouping and assign a number range that we created just before.

STEP 3: Fill in all the fields and click on save.

Define Number Assignment for Direction BP to Vendor
Path to Create Number Range
IMG⇒ Cross Application Component ⇒ Master Data Synchronization ⇒ Customer/Vendor Integration ⇒ Business Partner Settings ⇒ Settings for Vendor Integration ⇒ Field Assignment for Vendor Integration ⇒ Assign Keys ⇒ Define Number Assignment for Direction BP to Vendor
STEP 1: On the Display IMG screen, select Define Number Assignment for Direction BP to Vendor by following the above path.

STEP 2: Click on the New Entries to Assign Vendor account group and grouping.

STEP 3: Fill in all the fields, click on the same number of vendor account groups and grouping have the same number range, and click on save.

After doing this configuration we can create Business Partner using T.Code BP.
Thank you for taking the time to read my blog on Configuration for Vendor Master in SAP, to read more such insightful blogs on SAP S/4 HANA - https://www.gauravconsulting.com/blog
Our Upcoming SAP S/4 HANA Batches
SAP S/4 HANA FICO (Financial Accounting) - https://www.gauravconsulting.com/product-page/sap-s-4-hana-finance-beginners-live-training
SAP S/4 HANA SD (Sales and Distribution) - https://www.gauravconsulting.com/product-page/sap-s4-hana-sales-distribution-sd-live-training
#sap #saphana #hana #erp #SAPVendorMaster #sapbusinessone #s4hana #cloud #businessintelligence #analytics #it #technology #management #consulting #education #learning #teacher #student #educationmatters #edutech #elearning #STEM #globaleducation


Are you also looking to buy assignments online for your business statistics assignment help? Here at Global Assignment Help, you will find all the assignment help related to any subject field, either it is statistics or economics, Ask our Academic Experts for any help.
Also if you want your essay to be written by AI, you can use our AI Essay Writer tool for the topic on which you need essay. And if you are unable to find topic for your Essay, contact our experienced Academic Essay Writers.
EPTU Machine ETPU Moulding…
EPTU Machine ETPU Moulding…
EPTU Machine ETPU Moulding…
EPTU Machine ETPU Moulding…
EPTU Machine ETPU Moulding…
EPS Machine EPS Block…
EPS Machine EPS Block…
EPS Machine EPS Block…
AEON MINING AEON MINING
AEON MINING AEON MINING
KSD Miner KSD Miner
KSD Miner KSD Miner
BCH Miner BCH Miner
BCH Miner BCH Miner